

And the first one on the list is my Dad's present..... being a Vikings Hat because he likes the football team so much. In this blog I'm going to attempt to explain how to make this hat.... it's actually pretty simple...

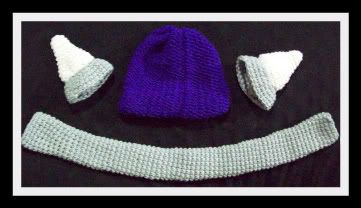
 From looking at this picture you can see your going to need a tube structure big enough to go around the brim of the hat. Also the horns, notice how they are expanding as they go downward. Then if you look underneather the white horns you'll see the "socket piece" holding the horns in place. those are pretty much discs that get slightly cupped inwards. and the hair that can be achevied by latch hooking some long strands of yarn through the bottom of the hat. so what we're looking at here is : 2 Horns, 2 shallow cups, 1 long tube to go around head, and a bunch of loose yarn that can be wrapped around something long enough for your project. It's just like art class where you take something that you're looking at and break it down into basic shapes, with crochet that's pretty much all you need. the rest is sewing and sculpting the pieces the way you want them to go.
 To make the base hat i usually use the 36 pegged knifty knitter loom and quick pop out at cap. I love that thing it makes my life so much easier... lol. But anyways... pick your colors of what will match your drawing/sketch.... you can base your selections on whatever you like.... these hats are custom labors of love so choose what you think the recipient would like and what would make them happy... that way it specialized well personalized really... i guess.
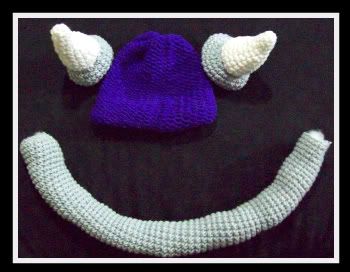
Ok so now ... I have all my shapes made out
notice the horns are already sewed on to the shallow cup shapes... I forgot to take pictures inbetween the process I was watching a movie while making them... Sorry. You start those shapes off by making a circle then work out from there ... work in groups of 3s when you jump up to make it fatter.... and do at least 2 - 3 rows of no groups inbetween each grouping. that prolly doesnt make sence.... I don't know how to word the stitch lingo.... I know it exsists but pretty much everything I know is improvised... lol the key to good crochet is consistancey. Make sure when you make the long tube shape it fits around your head snuggly but comfortably.. and that it's not too wide... you don't want the grey to take up your entire head. you want it as close to your sketch as possible! Once you get all the parts made it's time to sew! Sew the horns onto your shallow cups shapes right in the middle.... the get to stuffing!
I usually use Poly-Fil because it's so light you can barely notice it on your head..... and it give the hat more padding to keep heat in... it feels like you're wearing a pillow on your head but extremely comfortably. Once everyone's all stuffed with poly-fil or whatever.... start sewing the brim of the hat the the bottom of the hat... you're going to want to stuff your hat with something a little bigger then your head but not too much bigger though, you don't want to stetch it too badly. this is so it stays about the size you are going to have when it's on a human head. once you have it to the shape and size you want start sewing the tube onto the bottom of the hat. Make sure there is at le 2 more rows of the hat that are under the point where you want to sew it on.... those are going to be usefull if you want hair...

As you can see in this phot with my awesome boyfriend helping me out by being my hat model ...lol... I have everything sewn on... the tube goes all the way around and connects in the back ... I use a whip stitch to sew everything... but thats just me you can use whatever method you'd like..just make sure everything is secure so it won't be able to fall off ... even if little kids or dogs get ahold of it and try to destroy it... it's happens sometimes!.... but once everything is sewn on stuff the shallow cups with poly-fil to make them puff up like mine.
 Ok so now you should have something that looks sort of like a vikings Helmet...... It could use a little something.. don't you think? This is where the yellow yarn comes into play... I actually used 2 different colors of yellow one dark one wicked bright.
 I took my silkscreen out because it looked like it could be about the correct length I would need to make lengthy hair.... so I wrapped it around a bunch of times until I felt that it was going to be enough strands..... taking about 6 strands per each bunch up in my hand ... make sure they are all about the right length and fold them in half ..... take the bent loop piece of the strand and pull it through on of those bottom layers of the base cap that was left under the brim.... this is exactly like latch hook ..... you take the bent piece and you pull it under the stitch and then take the tail of the loop and pull it through it's self making a knot...... Make sure you mark out where you want you hair before placing them in there.... you can tie loose pieces of bright yarn to where your start and finish lines are for where the bright yellow and the dark

yellow yarn will go.... should only be enough to cover your ears......... i used 6 strands per each knot.... to give it thicker hair.... then I braided them and tied them with a piece of yarn very tightly and a few extra times around it again just to make sure.....
This is a finished side view of the hat... I think my dad will like it.... i sent a photo of it to my brother he said dad would love it ... so that's cool... guess I have to find another project to do...
I'm quite sure i'll start one tomorrow... unless I have to go to do that haunted house thing .... I get to help set up a haunted house again this year ... but this time i get to paint things and not people.... which is cool too......
ok so until next time I hope the directions weren't too confusing.
I'll put a few links to things that might better explain what i'm talking about.... or at least word it a little better then me. lol... ok hoep you like it tell me what you think.


No comments:
Post a Comment